
Sometimes you may notice the MoUSO Core Worker Process running in your Windows Task Manager, for example, USO Core Worker Process, usocoreworker.exe, or usoclient.exe. This process takes a lot of CPU and RAM and may cause problems.
This process is necessary to improve the stability and performance of your system and is responsible for managing the installation of Windows updates, which helps the operating system. USO also stands for Update Session Orchestrator. MoUSO Core Worker Process is also called MoUSOCoreWorker.exe. You can see this process when Windows checks for updates.
What is MoUSO Core Worker Process?
MoUSO Core Worker Process is one of the components of Microsoft’s UUP or Unified Update Platform, which is built-in in Windows 10. When your Windows needs to be updated, this process determines the order of downloading and installing the updates of the operating system.
This process runs when Windows checks and searches for updates. But sometimes, it remains active for no reason and considering that it consumes a lot of RAM and CPU, it may cause your system to hang or slow down. Sometimes this event causes your computer to go out of sleep mode for no reason.
Therefore, if you find out that the MoUSO Core Worker Process uses a lot of CPU and RAM on your system, you should look for a solution to this problem.
Here, I’ll walk you through some of the working solutions to quickly fix this problem.
Method 1- Install your pending Windows updates
As we said before, this process is related to installing updates. So the first solution is to install all the updates. To do this, do the following steps.
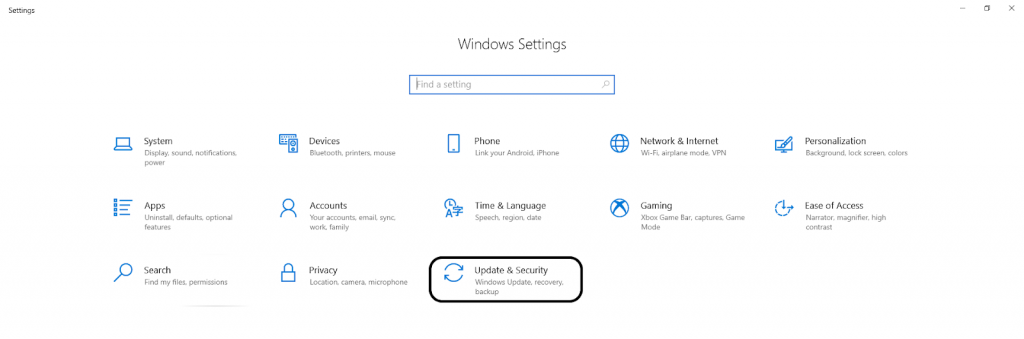
- Click on the Windows button on the keyboard or the Windows icon in the lower-left corner of the screen and go to settings (you can press the Windows + I buttons instead).
- From the options on the page, find the Update & Security option and click on it.
- Click on the Check for updates button to start downloading available updates. If there are other updates, click on View all optional updates to install them.
- If a new update is found by Windows, you must click on Install.
Method 2- Make sure that a cybercriminal has not hacked you
One of the essential things you should do before fixing the problem is to make sure of the authenticity of the process. A hacker may have used a name similar to the MoUSO Core Worker Process. So, first, make sure that this process is not from a Trojan. It should be from Microsoft.
- Enter the Task Manager by pressing the Ctrl + Alt + Delete buttons.
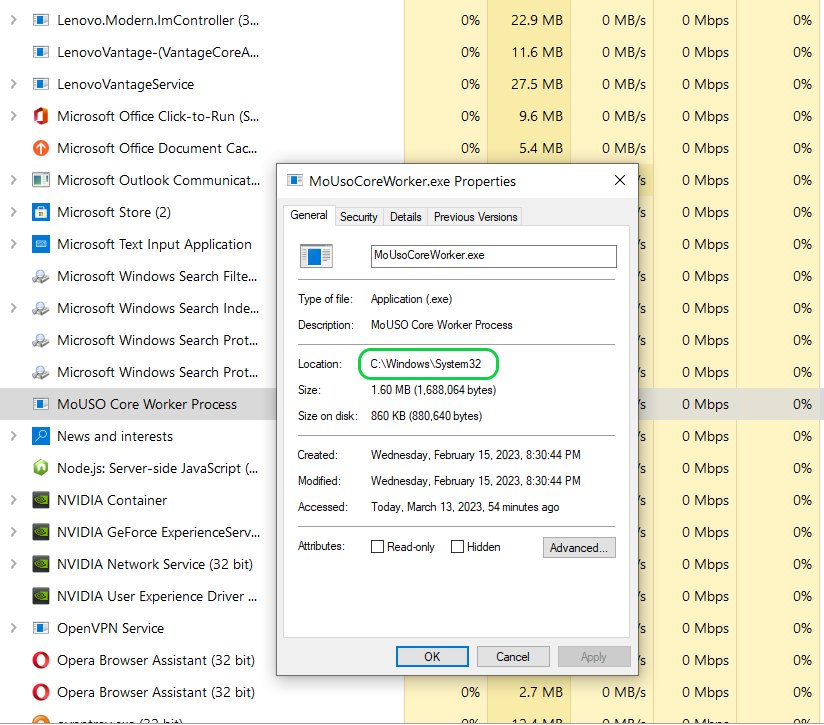
- Find MoUSO Core Worker Process from the list, right-click it, and select Properties.
- On the properties page, find the location and copy the path written in front of it.
- Now paste this path into the file explorer to see the executable file related to the process on the page.
- After finding the executable file, right-click on it and navigate to its properties.
- Then select the Details tab.
- Find the copyright in this window. “Microsoft Corporation. All rights reserved” should be written in front of it.
Method 3- Get help from your Windows Update troubleshooter
One of the great tools in Windows 10 is troubleshooting, which users can use to fix problems and issues with their system. This tool tries to diagnose your computer issues. To solve the problem related to MoUSO Core Worker Process, follow the steps below using Windows Update Troubleshooter.
- In your taskbar, there is a search box with a magnifying glass icon on the left side of it. Click in this box to open the search bar. (You can also press Windows + S buttons for this)
- You have to type the control panel in it to search for it. After finding it, click on Control Panel.
- Search for “troubleshoot” in the search control panel box at the top of the window. Click on troubleshooting in the search results.
- Click on View all from the menu on the left side of the page.
- On this page, there are all available troubleshooters. You should find the Windows Update troubleshooter.
- Click on windows update to open the troubleshooter window.
- Click on the “Next” button to start analyzing the problem. If the troubleshooter detects your system problem, it will fix it.
